Dynstr is a medium rated box on HackTheBox by jkr. To get a foothold we will abuse a command injection vulnerability in a DNS update service. After this we will change the machine’s DNS entries to resolve a hostname to our ip. With this we can use an earlier found ssh-key to log in as the bindmgr user. Finally we will abuse a wildcard in a bash script for which we have sudo permissions to obtain root.
User
Nmap
As always we start our enumeration off with a nmap scan against all ports followed by a script and version scan to get a full picture of the initial attack surface.
All ports
1 | |
Script and version
1 | |
Dyna DNS
Out of the 3 open ports 80 looks most promising so we will start our journey to root there. Opening the website in our browser we see the home page of Dyna DNS, a DNS service still in it’s beta phase.
Going over to services we see 3 potential hostnames and also a username and password.
Running gobuster reveals a nic directory in the first run.
1 | |
Going deeper on the nic directory in a second run we identify an update directory.
1 | |
Opening this page in our browser results in a badauth status message getting displayed.
The website seems to contain an endoint for dynu dns. Following the documentation we use the earlier found credentials as base64 and add it as header in burp.
1 | |
With this we get a different status message, indicating all is working well.
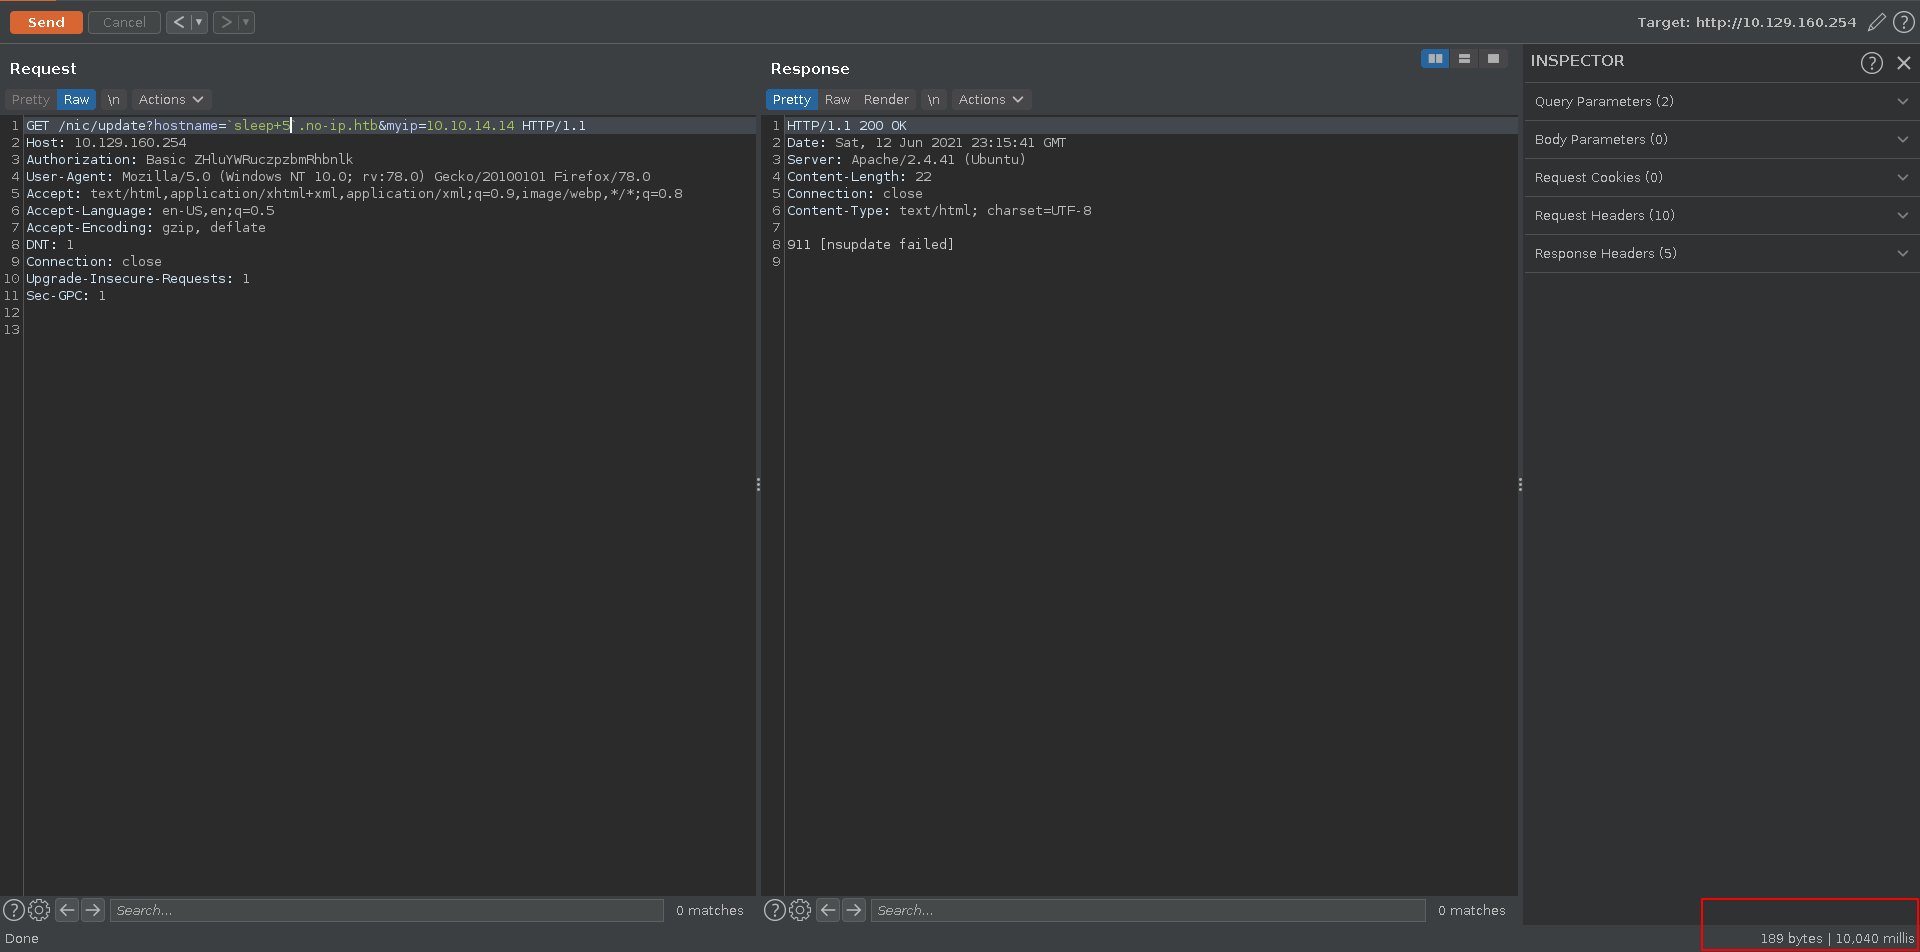
Playing around with the request in burp and testing for command injection we get a noticeable timedelay injecting sleep.
To get a shell we will eliminate bad chars as much as possible. First we will create an index.html file with a reverse shell.
index.html
1 | |
We serve it on our machine with a python webserver on port 80 and set up a listener on the port specified in index.html.
1 | |
1 | |
With preparations met we can now issue a curl request to our ip in decimal format to skip . and pipe the content over to sh. You can quickly convert your ip to decimal with the following one liner.
ip-convert
1 | |
Sending the request in burp we get a hit on our webserver and right afterwards a connection on our ncat listener.
1 | |
We upgrade our shell as www-data, fix the terminal size and continue our way to root.
1 | |
Traces and nsupdate
Looking in bindmgr’s home directory we find some leftovers from a support case.
1 | |
The C62796521-debugging.script contains an ssh private key and also some remanants of where the user tried to use the key for.
C62796521-debugging.script
1 | |
We take the key, clean the format and set the permissions for it to 600. Trying to log in with the ssh key as bindmgr does however not work yet.
1 | |
The reason for this can be found in the authorized_keys file in bindmgr’s ssh directory. It only allows ssh authentication coming from any subdomain of infra.dyna.htb.
1 | |
Luckily for us there is a key in /etc which we can use to update the machines DNS entries with nsupdate.
1 | |
Using the key we add a forward and reverse DNS entry for sftp.infra.dyna.htb. pointing to our machine. The next time the machine tries to resolve the allowed hostname it will see our ip connected with it and allow the authentication.
1 | |
Now we can use the ssh key to log in as bindmgr and grab the user flag.
1 | |
Root
Copy permissions
Checking sudo permissions we can see that bindmgr is allowed to run the custom script bindmgr.sh as root.
1 | |
The script checks for a .version file in the current working directory and the version number in it has to be higher than the one of the .version file in /etc/bind/named.bindmgr/.version. After this it copies all files in the current working directory with a wildcard to the /etc/bind/named.bindmgr/ directory.
Wildcards are often dangerous and it is also the case this time. Copying a file the resulting copy is owned by the user that issued the command. Since we can run the script with sudo this would be root in this case. This means if we can copy a suid binary we can run this binary as root.
bindmgr.sh
1 | |
First we identify the needed version to pass the first check of the script, which turns out to be the answer to everything.
1 | |
We echo a version number higher than this in a .version file. Next we copy a binary which we want to set the suid bit on to our directory, we will use bash this time. Afterwards we set the suid bit on it and create a file with the name --preserve=mode.
Because of the wildcard this file will be interpreted as a command line argument and allow us to keep the permissions set on our binary.
1 | |
Now we execute the script as root and bash gets copied to the /etc/bind/named.bindmgr/ directory, now owned by root and with the suid bit still set.
1 | |
We can now simply run it, get dropped in a rootshell and add the root flag to our collection.
1 | |


