Atom is a medium rated machine on HackTheBox by MrR3boot which got bumped from an easy rating to medium on its release day. In this walkthrough we first will abuse the electron-builder update system to get a reverse shell as a user. After that we will follow two similar ways to root both involving interacting with a redis service after finding and decrypting a password found in a config file.
User
Nmap
To start our enumeration of the machine, we begin with a full ports nmap scan, followed by a script and version detection scan on the open ports for a full picture on the attack surface.
All ports scan
1 | |
Script and version scan on open ports
1 | |
Web
Port 80 and 443 look most promising so we will start there. They both seem to serve the same content, which is a note taking app. You can download and install it on mac or windows, however this step is neither needed nor helpful to complete the machine, so we will just ignore it.
Electron-builder
Listing the smb shares next we see a Software_Updates_Disk share.
1 | |
Connecting to it we find a pdf and 3 client folders, also the whole share is writeable.
1 | |
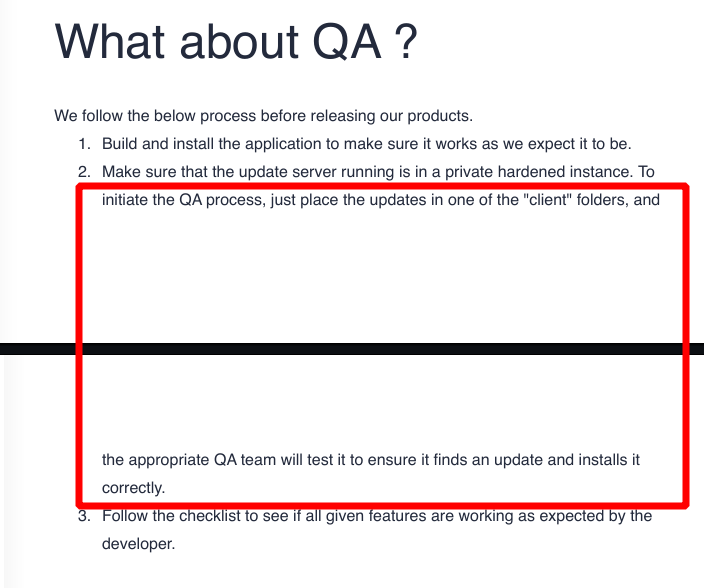
The pdf is a quality assurance documentation for the app downloadable on the webpage.
The interesting part is especially point two, in which is stated all updates placed in any of the client folders will be checked and installed.
There is a vulnerability in electron-builder which is described in this blogpost. Crafting a malicious yaml and exe, we can bypass the signature check in the install process by triggering a parse error in the signature verification script, placing a single quote in the filename. With this we are able to run an arbitrary exe on the target machine which is in our case a msfvenom reverse shell.
In a first step we create the reverse shell with msfvenom.
1 | |
We then create our latest.yml.
1 | |
The hash in the file is calculated from our malicious exe like in the blogpost.
1 | |
Finally we set up a netcat listener and a python webserver on the specified ports and place the latest.yml in a client folder on the smb share.
1 | |
After a short amount of time we get a hit on our webserver first.
1 | |
The revershell as jason follow’s seconds after.
1 | |
Now we can grab the userflag on jason’s desktop and start working towards SYSTEM
System/Administrator
PortableKanban
There are multiple ways to get system or administrator on the machine, I will cover two of them in this writeup.
Both of this ways start however with the PortableKanban directory in jason’s Downloads folder.
1 | |
Inside the folder there is a PortableKanban.cfg file which contains an encrypted Database password for the redis server.
1 | |
To decrypt it we can modify the script from exploid-db to only contain the decryption function and feed it our discovered encrypted password like this.
1 | |
Running it decrypts the password instantly.
1 | |
With this we can now connect to redis with redis-cli
1 | |
Route 1 Redis Keyspace
Now the ways to system splits. We will first follow the one which seems to be intended.
Running the info command we see at the bottom of the output below # Keyspace, that there is one database with 4 keys.
1 | |
We can list all the keys with KEYS * and print the key with ET KEY.
1 | |
1 | |
We find a password for the administrator user which is encrypted again. However we can decrypt it the same way we did before only swapping the value for the hash in our short python script.
1 | |
Running it gives us the administrator’s password this time.
1 | |
There are multiple ways from here to get a shell as this user on the machine. You could for example use psexec to gain a system shell. Since the second way involves a shell as system anyways we will use evil-winrm to connect to the machine as administrator.
1 | |
Route 2 filewrite => RCE as system
The second route also works with redis but it slightly different. With redis we have arbitrary file write in the web root and the webserver is running as system. This makes it easy to create a simple webshell in the webroot and get codeexecution as system
1 | |
Calling whoami on our webshell we see that we have indeed code execution as nt authority\system.
All that is left now is to send the request to burp for convenience, change the request method, download and execute the nishang Invoke-PowershellTcp.ps1 reverse-shell from our webserver to get a shell as system.
1 | |
Shortly after a hit on the webserver we get the shell as nt authority\system.
1 | |


